Monday, 13 October 2014

Think Pink! nail art design

As most of you probably know, October is a very special month - it's the pink ribbon month dedicated to spreading awareness about breast cancer. 
To honour this month, and to help spread the the word and the colour pink I have put together a little post about a pink nail art design that I came up with for the occasion. Just as with some recent nail art designs, I have gone for a multiple accent nail style, where the nails are of different styles but still match each other colour wise.

The nail polishes I've used for this design are:
No7 Speed Dry Berrylicious
Barry M Gelly Lychee
Nails Inc Udderly Shocking Pink
Barry M Nail Paint Silk Blossom
I've also used some little nail art pearls as decoration. These are from Amazon and only cost me about a pound, including delivery.

I started off with a water marble design on two nails on each hand, and this is a reminder of how you create this lovely and swirly design;
1 You need a disposable cup, toothpicks, sticky tape, tissues and a few different coloured nail polishes.
2 Place the tape around the nails to avoid getting polish on your skin.
3 Fill the disposable cup with room temperatured water.
4 Start dripping nail polish into the water. Make sure you do it from a low point so that the nail polish don't drop too fast and end up sinking. You want the first drop to spread out on the surface of the water.

5 Keep dripping the different coloured nail polishes into the cup of water, and create a bullseye. You usually need 10 drops to complete your bullseye.
6 With your toothpick, start drawing a simple pattern in the bullseye. I've opted for 4 strikes outward to begin with, followed by 4 strikes inwards, which creates a sort of flower or butterfly pattern.
7 Once your happy with your pattern, line up your nail over the water surface and your favourite part of the pattern, and simply dunk your nail into the water. Keep your finger in the water whilst you clear off the excess nail polish floating about on the surface.
8 Once the surface is clear, slowly pull out your finger, and voilá - you've got your water marble nail art. Now just remove the tape and clean up your cuticles with a cotton stick dipped in nail polish remover.
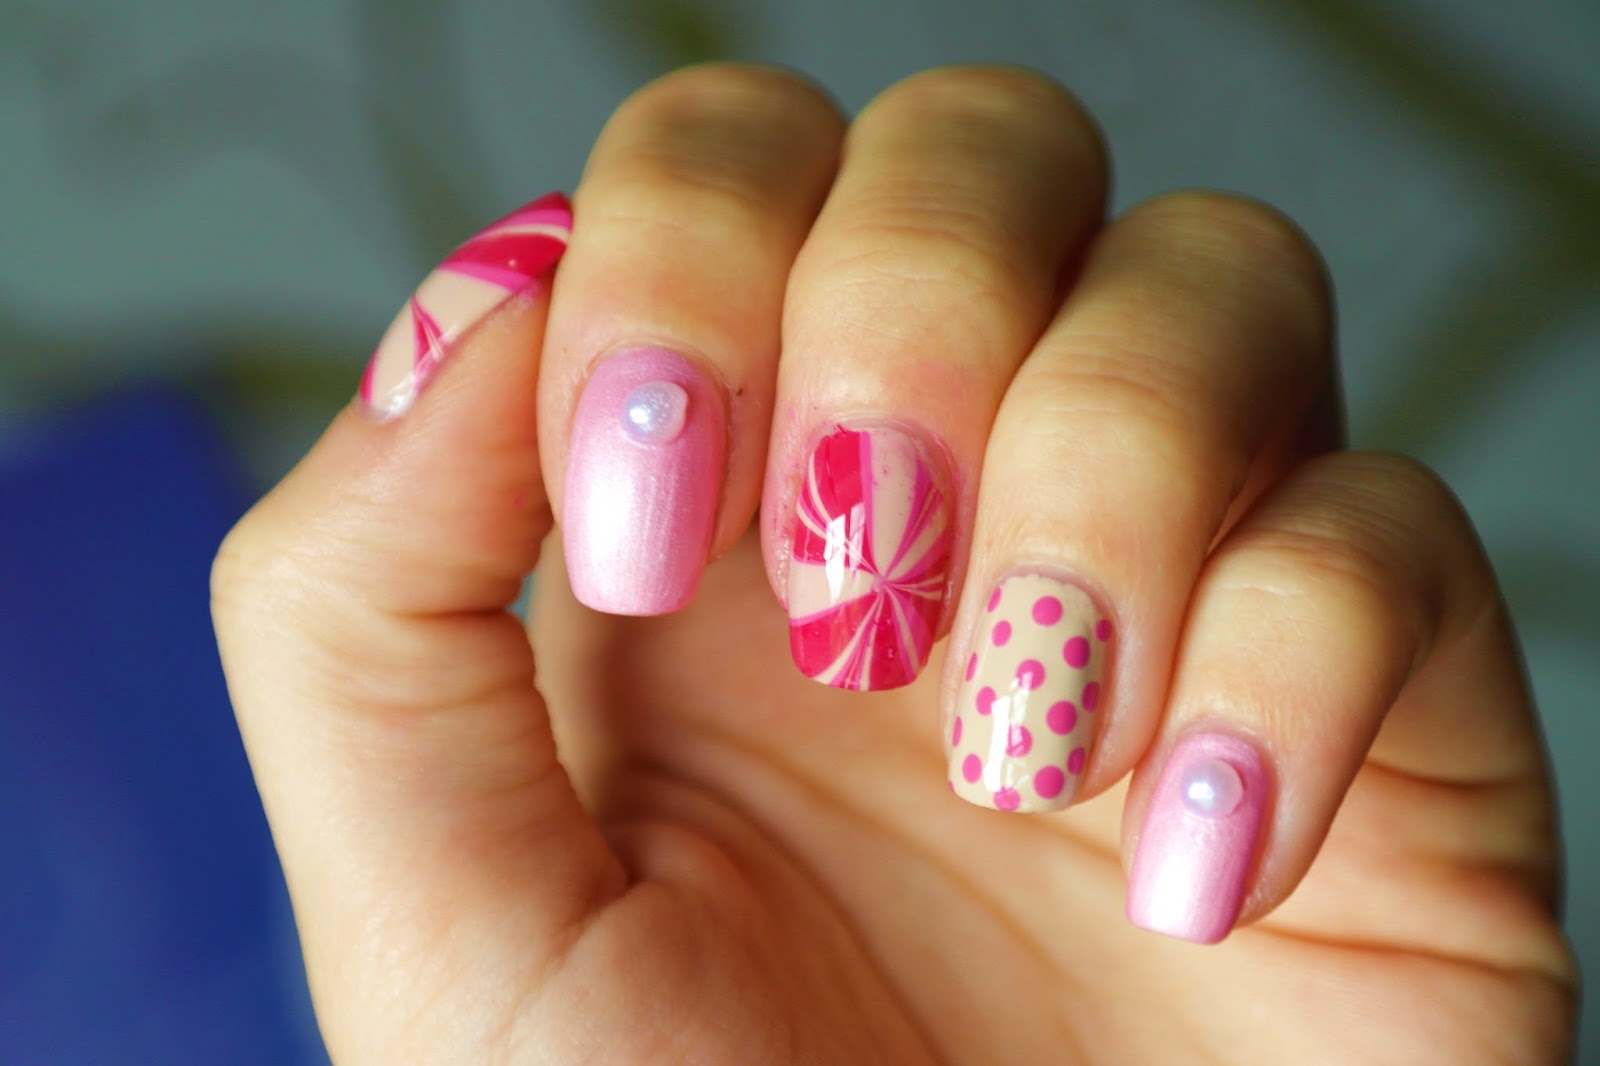
For my other nails I went for simpler deigns; the nails in the silky pink polish by Barry M simply got some little pearls added to them (see a similar tutorial about how to apply studs on your nails), and the ring finger ended up with simple pink polka dots on a beige base, using a dotting tool.

What do you think of my pink nail art design for breast cancer awareness month?

Monday, 6 October 2014

Making a statement with the colour mint

mint dress
It was my best friend's birthday last weekend, and that was a good enough reason to go out and celebrate with some dinner and drinks in Leeds city centre. Since it seemed to be the last semi-warm weekend of this Autumn, I took the chance to wear my strapless mint coloured midi dress, with both my arms and my legs out. 

mint bodycon dress
I bought this gorgeous mint bodycon midi dress from Boohoo in the end of the summer, and wore it for the first time to the live cinema event for Back to the Future in London - we were all supposed to wear something 50's inspired for the event, and I thought the mint colour was a very appropriate colour to opt for. 

taupe clutch bag
For my friend's birthday dinner, I matched my dress with this taupe coloured clutch bag with stud details. Sorry guys, but I don't know where it's from since it was a birthday present from a friend of mine. If you're desperate to know, just let me know and I'll ask her.
The silver ring with a turquoise stone matches the dress perfectly - I got this from Accessorize, and you can see a close-up of it in my latest post about turquoise nail art.

black leather platform shoes
I LOVE these shoes! They may look uncomfortable, but they're not! This was a bargain find at Deichmann last year. They're real leather, but since I found them in the sale they cost me next to nothing.The contrast of the leather and the velvet straps is just stunning!

mint statement necklace
And talking about stunning... don't you think this statement necklace is the perfect piece of jewellery to top off my mint outfit? It was a present from my fellow blogger and Swede-in-Leeds Kristina from Mode of Style. She knows me too well :)

mint lace dress
When looking closer at the dress it has got a beautiful layer of lace at the bust. You may recognise this feature? A while ago I featured a navy halterneck dress with the same type of lace, and they're both from the same collection at Boohoo.

newspaper nails
I attempted a newspaper style nail art for the occasion - I thought it looked very romantic, and kind of antique shabby chic. I didn't actually photograph the process of this type of nail art, but I promise I'll do a similar style soon with a tutorial on how to create newspaper nails.

Monday, 29 September 2014

Dressing in classic forest green for Autumn

green shirt dress
There's no denying that Autumn is here, and every Autumn I seem to fall back to the same colours when it comes to clothes - one of them being a dark forest green. Last Autumn you saw me wearing a Japanese style tunic, and this year I'm opting for a simple shirt dress.
Sometimes simple is just what I need, and this style is near effortless. The shirt dress itself, which is from Primark, is very casual, but you can make it work with a pair of leggings and heels for a complete Autumn outfit.  
The material is very thin and flowy without being transparent, and the shirt dress has got a straight shape with a tie at the back to mark your waist if you wish. It has also got roll up sleeves and cute buttons as details to make it a bit more interesting. Very comfortable indeed!
mid heeled brogues
I'm pairing it with simple black cotton leggings from H&M, and these reddish brown mid-heeled brogues from New Look.
I don't know if you agree, but in my opinion a plain outfit needs statement accessories!
statement necklace
This gorgeous statement charm necklace in burnished gold and silver is from Accessories Boutique.
I just love how no charms look the same, but how they all compliment each other, and how they match my green shirt dress perfectly.
Burberry nail art
I'm also wearing an oversized white ring, which is actually a real shell with a whole cut out right through it so that you can wear it on your finger.
Burberry nails
To top it all off I'm sporting beige, black and red nail art this week. The colours are inspired by Burberry's iconic pattern, which I have attenpted on my index finger. 
If you can't wear designer brands, hey... ;)

Friday, 26 September 2014

Mixed turquoise nail polish design with studs

Turquoise and teal are some of my favourite colours, especially for summer when you’ve got a bit of a tan going, but these coloures obviously work all year around. Perhaps just vary between different hues, and go for a brighter colour in the summer, and a darker and dusky colour in the winter.
Anyway, you all know how much I love nail polish, and the design I’ve come up with this week consists of three colours that all match and compliment each other.

The polishes I’ve used are:
Revlon Ocean Breeze (scented nail polish)
Barry M Mint Green
Zoya Pixie Dust Godiva

turquoise nail polish
Just as with my previous nail polish design with multiple accent nails, I’ve opted to go for one main colour, with a couple of nails being the contrast nails.
I started by deciding which nails I wanted to paint in what colour, and applied two coats of each polish.

I’m not going for any crazy patterns this time, but I only painted my nails with one colour per nail.
To spice up the design a little bit I’m adding some tiny metal studs in silver.

I bought a pack of about 100-150 mini studs from Amazon for about 40 pence, including delivery. Bargain!
The pack includes both gold and silver coloured studs, and for this design I’m opting for the silver ones.

Start by placing your studs on a piece of paper with the bulged side up. Count that you’ve got the right amount before applying them to your nails.

Make sure your second coat of nail polish hasn’t dried yet – it’s easier to apply the studs then. But don’t worry if it has dried – you can always paint on another coat, or just add a drop of clear polish where your stud is going.

Pick up the studs with a dotting tool or an orange stick, by dipping it in clear nail polish and them simply touching the top of the stud. Measure where on your nail you want to place it, and carefully push it down onto the nail.
Apply a layer of top coat on top of everything to avoid your studs coming off.

turquoise nail polish with studs
And this is the finished result – a turquoise theme with glitter and stud details. I managed to keep mine for over a week without it chipping, which just shows how important it is to zeal your design with a good top coat. The one I’m using is from No7, and is rock hard.

What do you think? If you’ve created a multiple accent nail design I would love to see it! Leave your links in the comment section below.

Oh, and it's always a plus when you've got matching jewellery ;)