
After having seen quite a few images on various blogs with this so called 'water marble nail art' I was dying to try it for myself, but I had no clue whatsoever on HOW??!
I watched a tutorial or two on how to do it and failed big time, until... until I found this amazing You Tube-er called My Simple Little Pleasures. I watched pretty much all of her fantastic videos with how to guides on how to do water marble nail art, and after a couple more tries I nailed it!
Not sorry for that pun at all by the way ;)

The first thing you need to do for this type of nail art is prepare.
Pick your polishes for a start. I've chosen to go for a very neutral marble with 4 different colours;
Seventeen Mocha
Barry M Lychee
Barry M Black
Barry M White
You also need a good top coat to finish it all off with. One that I can recommend that goes really hard and that dries quickly is No7 Gel-Look Shine top coat.
Just bear in mind that all colours don't work together. I.e they might not spread on the water, they might spread too much, or they might even sink - so it's worth it giving them a test drive beforehand.
Apart from your nail polishes, this is what you'll need in order to create your water marble nail art:
Small disposable cup filled with room temperatured water
Sellotape
Scissors
Tooth picks (or an orange stick)
Kitchen roll (or napkins)
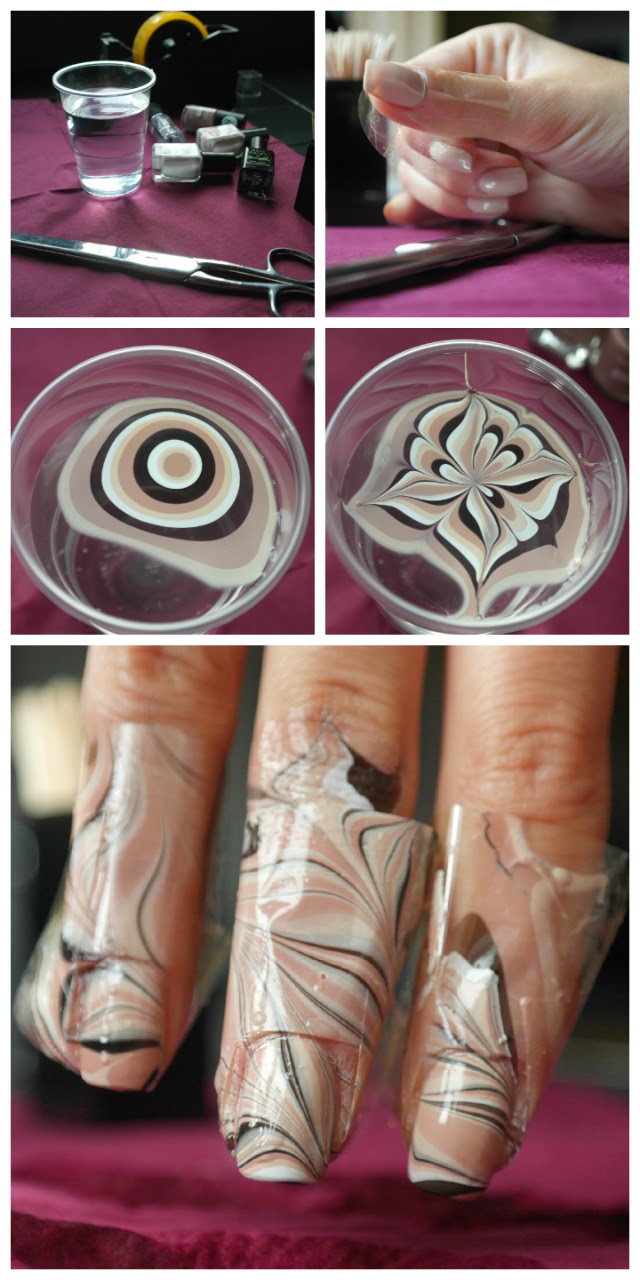
1. Start by putting all your materials on the table so that they're easy accesible.
2. Tape your fingers with sellotape to avoid getting too much nail polish on your skin.
The easiest way to tape a finger is to place a short piece right below your cuticle, and then one longer piece that goes around the sides of your nail.
3. Start dripping nail polish into your water filled cup, one drop at the time. Don't drop from too high up as this may cause the nail polish to sink. The drop of nail polish will spread out and create a ring on the water surface. Drip your next drop of nail polish inside the first one, and keep doing this until you have a so called 'bulls eye'.
4. Now try to be as quick as possible. Get your tooth pick or orange stick ans start drawing a pattern in the nail polish. Don't start at the very outer ring though as that will be too dry, but start 2-3 rings in. How you draw it is up to you and you'll find your way by experimenting. You can either start drawing from the outer ring and in, ot from the middle and out.
5. Line up your taped fingers (you can do more than one finger at the time) above a piece of the pattern that you like. Dunk the fingers in the water, and KEEP THEM THERE.
Whilst you still have your fingers in the water, clean up the excess polish on the surface of the water with your tooth pick.
Once the surface is clear, slowly pull your fingers out.
Remove your sellotape using the scissors, clean up the polish that has ended up on your fingers rather than on your nails with the help on a cotton stick, and... VOILÀ!

But... since I'm really picky with my nails and I didn't quite like the big spaces where I only ended up with one colour, I've decided to use my nail art dotting tool to add some quirky little polka dots.
And this is my finished result of water marble nail art mixed with the dotting technique.

Just don't forget to seal it all with your top coat once it's all dry, to make it last longer.
I'm pretty pleased with this nail art, especially since I'm newbie when it comes to water marble.
What do you think?
Have you ever tried it or thought of giving it a go?
Whaaaaat!! I haven't heard of this before right now!! I am going to save this and do it this weekend!! Thanks Maria :D
ReplyDeleteI hadn't heard about it before either. It's not as hard as it looks. Glad you like it, and good luck :) xx
DeleteLOVE your tutorial girl! Your nails look absolutely amazing. I'm definitely going to have to try this ASAP!
ReplyDeleteXOXO
Ashley
ashleyspassionforfashion.blogspot.com
Thanks hun. I'm so glad you like it. Thanks for your sweet comment :) xx
DeleteThey look so good! I just dont have the patience to do this. You will have to do it for me ;)
ReplyDeleteMiss Tulip x
The Thrifty Magpies Nest
Verkligen häftigt!
ReplyDeleteStunning results. I've tried to do this one, but never really worked. You've absolutely nailed it though ;))
ReplyDeleteLu, www.balgarka.co.uk
Fashion Giveaway from the streets of Camden Town